elisabeth andrée

about crochet


18 Comments

crochet bag done and a shawl in the works

welcome! nice of you to stop by!

last week i made this supermarket bag for my brother and the question was: would he mind using it? gladly he likes the bag and wouldn’t mind using it at all. the body of the bag is made with catania color number 242 (anthracite) and the top and handles with phil coton 3 color number 54 (canard)

lilac

for the lilac shawl in the works (below) i – again – work with katia peques acrylic yarn, this time with crochet hook size 4.00 mm. the hue is a slightly lighter than the lilac of this stole/scarf.

for my current wip i also use a stitch pattern of mypicot and the route to find the diagram is: mypicot.com – openwork & lace – pattern number 2037. you can find it here and this is the direct link to the pdf

small side table

a project for the nearby future is a cover for the top of this small side table and i think i know what to make but i will tell and show you another time.

until then keep crocheting, knitting and all the other creative activities that makes the world a little more beautiful.

joining ginny’s yarn along at small things

thanks for visiting and hopefully until next time!


20 Comments

crochet projects done and work in progress

welcome! hopefully all goes well with you!

it’s been about three weeks since i last wrote a blog post. 

in recent weeks i finished the yellow vest and a new version of the orange spider bag.  

this time it has become the lilac spider bag with a different type of top and handles, but the stitch pattern is the same. at first the shape of the bag has not become what i had in mind, i put it in the closet and have not looked at it for a few days and now i actually think the bag looks fine. i still have some improvements to make and after that i will post a couple of new photos.

collage lilac spider bag by elisabeth andrée

the yellow shrug is also finished and as you can see it is not haute couture, but it wears very comfortable and feels so soft. i love the thing!collage yellow shrug by elisabeth andrée

opaline

a few years ago i worked on the blue diamonds blanket and although it is not quite done i want to do something similar.

diamonds blanket crochet and embroidery by elisabeth andrée

and maybe you can remember the baby blanket? see here for the pictures and pattern. i had made some variations on the stitch pattern of that blanket, please see here for the photos. the large dark gray blocks i like the most and that is the pattern i chose to make a blanket of only those fake squares.

collage blankets by elisabeth andrée

the new blanket will be a combination of the ideas of these three blankets.

the yarn is called opaline and it is phildar impact 6 and i crochet with hook size 6.5 mm. the color reminds me of sea glass and therefore i want to decorate the rug with colors that you can see on pictures of sea glass, see here or here

i still have a long way to go before the blanket is finished, but i find it quite fun to work on while imagine how i’m going to decorate it.

opaline blanket in the works by elisabeth andrée

that is it for today, the ‘how to’ for the foldover bag is coming, please be patient for a little while?

joining ginny’s yarn along at small things

thank you for visiting my blog and hopefully soon!


22 Comments

crochet work in progress: giant cushion, blanket and more

welcome!

we are halfway the week and i almost forgot that it is work in progress day 🙂

hope you are fine and that every day you find a little time for yourself to be creative?!


i am still working on my soft ribbing pattern and so far this is my favorite of all blankets i have made (i think, because i love them all). if you like the look of this blanket in the making, here is the link to how to crochet a stretchy ribbing fabric.

wip crochet soft ribbing blanket by elisabeth andrée


another wip is the giant crochet cushion made of brown variegated squares with colored edges. currently i sew the squares together, one side of the cushion is half way done. more info about the yarn and the squares you can find here.

wip giant cushion cover of brown variegated squares with colored edges


last but not least, the foldover bag and the small cases are still waiting to be finished.

wip scheepjes stonewashed bag and cases


but one part of this set is done and that is the small mesh shopper. if you like to know how it looks and are curious how to make this bag yourself, here is the link to the info


small crochet mesh shopper inside by elisabeth andrée


well that is it for today, but of course i love to join ginny’s yarn along at small things. if you like to see creative projects just click on the link. 


wish you a wonderful day and i hope to see you again very soon!
thanks for visiting!


13 Comments

small crochet mesh shopper

hello! happy new week!

sorry, it took a while but here are the explanations to make the first bag of the set (see my previous post). more to come in nearby future 🙂 

below are my notes, it is not a detailed pattern, but i hope it’s sufficient to crochet your own small mesh shopper. would you prefer a comprehensive crochet tutorial, you can take a look here: how to make a mesh bag.

crochet mesh shopper 3 colors yarn


 here we go!


used yarn:

scheepjes stone washed XL, for the body green agate and blue apatite, for the top and handles smokey quartz, 1 ball of each color. more info about the yarn here.

UPDATE! this is the correct link to the info about the XL version of the yarn

close up of stitch patterns in three colors


i worked with crochet hook 4 mm.

stitches used in american terms:
  1. chain = ch
  2. slip stitch = ss
  3. single crochet = sc
  4. half double crochet = hdc
  5. double crochet = dc


body of the bag


the height of the body of my bag is about 27 cm.

  • start with a magic ring
  • row 1. 1 ch, 8 sc into ring, ss into first sc
  • row 2. 1 ch, 1 sc in first sc, *3 ch, 1 sc in next sc*, repeat between * and * until you have  7 loops, end with 1 ch and 1 hdc into the first sc = 8th loop
  • row 3. 1 ch, 1 sc over the hdc, *4 ch, 1 sc into next loop*, repeat between * and * until end of row, but end with 2 ch and 1 hdc into first sc
  • row 4. 1 ch, 1 sc over the hdc, *4 ch, 1 sc into next loop, 4 ch, 1 sc into same loop*, repeat between * and * until end of row, but end with 2 ch and 1 hdc into first sc
  • row 5. 1 ch, 1 sc over the hdc, *5 ch, 1 sc into next loop*, repeat between * and * until end of row, but end with 2 ch and 1 dc into first sc
  • row 6. 1 ch, 1 sc over the dc, *5 ch, 1 sc into next loop*, repeat between * and * until end of row, but end with 2 ch and 1 dc into first sc
  • row 7. 1 ch, 1 sc over the dc, *5 ch, 1 sc into next loop, 5 ch, 1 sc into same loop*, repeat between * and * until end of row, but end with 2 ch and 1 dc into first sc
  • row 8. 1 ch, 1 sc over the dc, *5 ch, 1 sc into next loop*, repeat between * and * until end of row, but end with 2 ch and 1 dc into first sc
  • row 9 and further. repeat row 8 until your bag has the height you like to have.
    note: better don’t make the body to large because it really stretches (see photo below).
    crochet mesh shopper by elisabeth andrée


top part of the bag


the top part of my bag measures about 5.5 cm.

  • row 1. 1 ch, *1 sc into next 5 ch, 1 sc into sc*, repeat between * and * until end of row, ss into first stitch
  • row 2. 1 ch, 1 sc into first sc, *1 ch, skip 1 sc, 1 sc into next sc*, repeat between * and * until end of row, end with 1 ch and ss into first sc
  • row 3. 1 ch, sc into first sc, 1 ch, skip 1 ch, 1 sc into next sc*, repeat between * and * until end of row, end with 1 ch and ss into first sc
  • row 4 and further. repeat row 3 until you like the height of the top part. 


handlessmall crochet mesh shopper handles


the handles of my bag are circa 26 cm long and are located about 5-6 cm from the sides, there is about 17-18 cm between start and end points of the handles.

hold or lay bag flat and measure where you like to have your handles, the ‘scar’ (that is where you start and end the rows) will be at the side.  


  • row 1. 1 ch, sc into first sc, *1 ch, skip 1 ch, 1 sc into next sc*, repeat between * and * until you reach the starting point of your first handle, crochet sufficient chains to create the length you like to have for you handle (remember the number), 1 sc into sc at the ending point of your first handle, continue with the stitch pattern, until you reach the starting point of your second handle and crochet the same number of chains as your first handle, 1 sc into sc at the ending point of your second handle, continue with the stitch pattern until end of row, end with 1 ch and ss into first sc
  • row 2. 1 ch, sc into first sc, *1 ch, skip 1 ch, 1 sc into next sc*, repeat between * and * until end of row, end with 1 ch and ss into first sc
  • row 3. make 1 ss into all the sc, skip all the 1 ch spaces, work loosely, the slip stitches look large!
  • weave in yarn ends
  • attach yarn at left beginning point of one handle and make 1 ss into each of the chains until you reach the end of the handle, continue working at the top part of the body between starting and ending points of the handle, make 1 ss into all subsequent sc, skip all the 1 ch spaces, work loosely, ss into first ss. weave in yarn ends.


make the second handle in the same way.


optional


make a small band/strap that fits around the top part of the bag to hang a keyring onto (or something else). 

crochet chains to required length, turn, 1 ss into second ch from hook and into all subsequent chains, turn and work on the other side of the chains, 1 ch, 1 ss into first ch and into all subsequent ch until end of row, cut yarn, hang keyring onto band, fold band around the top of the bag and sew ends of band together.


you are done!


hope you like to use your little mesh bag very often!
until next time!


72 Comments

how to make a mesh bag

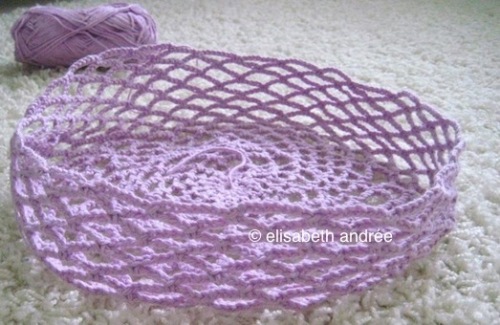
how can i crochet a mesh bag myself? i received this question a couple of times in response to the week of mesh bags. i promised to write down a how to for a basic mesh bag with which you can make your own variations. 

how to make a mesh bag by elisabeth andrée how to make a mesh bag by elisabeth andréehow to make a mesh bag by elisabeth andrée

a few notes
  • the type of yarn you work with has its own character and will influence the appearance of the bag
  • it is important not to crochet too loosely
  • when attaching a new ball or a different color attach it extra tightly, weaving the threads in, make a knot and weaving in again. this is because the tension on the thread when you use the bag
  • do not be tempted to make your bag too big because there’s a lot of stretch in it. especially if you’re a smaller sized person it happens that you drag your bag on the floor when it is filled

in this mesh pattern

how to make a mesh bag by elisabeth andrée
  • you make chains and sc, but if you like you can replace the sc for dc
  • at the beginning of a row you always start with 1 ch and 1 sc over the last stitch of the previous row
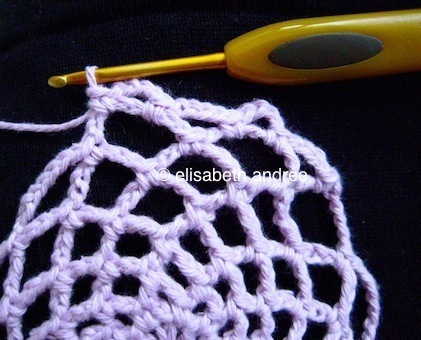
  • to increase you make the rows with a different number of chains and at the end of a row you finish into the first sc with a stitch that makes you end at the top of a chain space (see photo’s):
  1. 3 ch end with 1 ch and 1 h dc
  2. 4 ch end with 2 ch and 1 h dc
  3. 5 ch end with 2 ch and 1 dc
  4. 6 ch end with 3 ch and 1 dc
  5. 7 ch end with 3 ch and 1 tr
  6. 8 ch end with 4 ch and 1 tr 
  7. if you make larger chain spaces (10, 12, 20 chains) you end a row with a sc into the first sc and ss to the top of the next ch space
used materials and stitches

for this tutorial i have made a small sized bag (though he reaches my ankles, but i’m only 160 cm)

how to make a mesh bag by elisabeth andrée

  • cotton 8 (that is a basic cotton yarn)
  • 1 skein for the main color, i used lilac
  • and a selection of other colors, no whole skeins necessary
  • crochet hook size 3 mm
  • used stitches (american terms): 
  1. chain = ch
  2. slip stitch = ss
  3. single crochet = sc
  4. double crochet = dc
  5. treble = tr

pattern for the bag

start with a magic ring

  • row 1. 3 ch (= first dc and 1 ch), *1 dc, 1 ch*, repeat between * * until you have 11 dc and 11 ch (= total of 12), ss to 2nd ch addition: this row forms the basis for you bag, but you can make this basis as large as you like. you can use any round pattern small or large and then start with the mesh pattern. a larger round basis creates a rounder shaped bag. the pattern you are reading now creates a little more narrow shape.
  • row 2. 1 ch, 1 sc in the first 1 ch space, *3 ch, 1 sc in the next space*, repeat between * * till second last space,
    see notes about how to start and end every row
  • row 3. 4 ch
  • row 4. 5 ch
  • row 5. 6 ch
  • row 6. 7 ch
  • row 7. 8 ch
  • row 8. 4 ch, *1 sc, 4 ch, 1 sc, 4 ch* repeat between * * in every 8 ch space till end of row


  • row 9 – 12. repeat rows 4 – 7
  • if you like to make your bag wider repeat rows 8, 9, 10, 11 and 12
  • continue crocheting row 7 until the body of your bag has the size you want.


top part of the body

how to make a mesh bag by elisabeth andrée

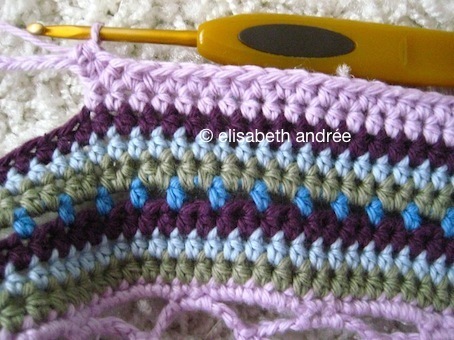
  • row a. make 5 ch, 2 sc, 5 ch, in every ch space, end the row with 1 sc next to the first sc, ss into first sc
  • row b. no ch but make a sc into the first ch space, make another 4 sc in the same space, 1 sc in next two sc, make 5 sc into all the other spaces and 1 sc in every sc
  • tie off yarn 
  • row c. attach another color, 2 ch, 1 h dc in every sc until end of row, tie of yarn 
  • row d and e. attach another color, 2 ch, 1 h dc in every stitch until end of row, tie of yarn
  • row f. 3 ch (= first h dc and 1 ch), *skip 1 stitch, 1 h dc in next stitch*, repeat between * * till end of row, tie of yarn
  • row g. attach another color into first 1 ch space, 2 ch and 1 h dc in same space, *2 h dc in next 1 ch space*, repeat between * * till end of row, tie of yarn
  • row h and i. attach another color, 2 ch, 1 h dc in every stitch until end of row, tie of yarn

handles

  • measure the width of the top edge of your bag and decide where you would like to have the handles, my handles begin en end 9 cm from each side.
  • to be sure i’ve used row f. as my reference: i counted the spaces between the handles at the front and back side (18 spaces) and i counted the spaces between the handles on both sides (24)


attach main color on a side of your bag
  • row 1. 2 ch, h dc in every stitch until the stitch where you want to start the first handle, make a number of chains until your handle has the length you want, 1 h dc into the stitch where you want to end you first handle, 1 h dc in every stitch until you reach the stitch where you want to begin your second handle, make the same number of chains as for your first handle, 1 h dc into the stitch where you want to end your second handle, h dc in every stitch until end of row, ss to first stitch
  • row 2. 2 ch, 1 h dc in every h dc and every ch, end with ss in first sc
  • row 3. repeat row 2
  • tie of yarn as describes before

attach another color
  • ss in every h dc in the back loops only
  • tie of yarn as describes before
how to make a mesh bag by elisabeth andrée
  • attach another color in the first stitch of the part between the beginning and end of a handle and ss in every stitch in the back loops only until end of row
  • tie of yarn as described before
  • repeat this on the other side of the bag
how to make a mesh bag by elisabeth andrée
  • weave in remaining ends.

your bag is now ready for use!

how to make a mesh bag by elisabeth andrée

.