elisabeth andrée

about crochet


7 Comments

another crochet square: a new variation to try

good to see you!

it’s already monday afternoon, at least in the part of the world where i live, and i hope you will have a great new week!

would you like to try a crochet square? i made a variation on ‘the another square‘ and i just posted the recipe as an update. you have to scroll down a bit to find it because the new instructions are located under the instructions of the original ‘another square’. 

hope you like the square and have fun with crocheting it! this is the link to it.

until next time!

close up of another square variation by elisabeth andrée


12 Comments

crochet projects: one finished, one wip and something vintage

welcome! thanks for stopping by!

last week i have not worked on my opaline blanket, but i have done a few other things.

lacy with dots crochet cushion cover

one project is finished and that is this lacy with dots cushion cover.

it is made with three colors of scheepjes softfun. more info about the yarn you can find here and the pattern for the square here

crochet bag

this bag is finished too, the crochet work i mean, it needs a lining but so far i didn’t find a fabric i like.

the bag is made with cotton 8 of the label scheepjes (info here), lovely yarn although it is a little thinner than the cotton 8 i’m used to of other labels and therefor it is not really suitable for making bags (i think). the result is a bit baggy hence lining is needed.

vintage square

last night i tried a vintage pattern, i’ve pulled out the last few rows because the square was getting wobbly and crocheted a modified fifth row and this is the result. i am not a great lover of bobbles (except for edges) but i love this square!

the pattern counts 7 rows, it is free available here (scroll down for the picture of the square) and it is an easy to follow description.

well, that is all i have to share this week.

joining ginny’s yarn along at small things

until next time!!

details of crochet bag by elisabeth andrée


11 Comments

toy for a dog crochet pattern

not long ago i introduced young dog balou and told that i have made him a toy. the last message is that balou still plays with it and does not destroy it. these pictures i have received:

then i thought, let me make a few more toys, and so it happened while i wrote down the pattern. at first, i was inspired by a diagram for a scrubber, this is the link to it.


the toy is intended for a dog to play with, but depending on used materials and colors, it is suitable for multiple purposes. i have adjusted the pattern of the first toy just a little.

.
maybe you want to crochet one or more toys, so here is the pattern.


material and stitches

what you need is leftover cotton yarn, i used cotton 8 with crochet hook size 3.0 mm. for one toy, in total, i have not even used 1 ball of 50 grams. 

you also need a needle with a blunt point and acrylic yarn ends for the stuffing.

i have the toys filled with acrylic yarn ends because i think acrylic attracts less ‘dirty creepies” and dries quickly after washing and just as important, it is light weighted comparing to cotton.


stitches in american english terms
  • ch = chain 
  • ss = slip stitch
  • sc = single crochet
  • hdc = half double crochet
  • dc = double crochet


instructions

start with a magic loop

row:

  1. 1 ch, 12 sc in ring, ss in first sc
  2. 1 ch, 1 dc into same stitch as ss, 1 dc into next 11 sc, ss into first dc
  3. 1 ch, 2 sc in same stitch as ss, 2 sc in each of next 11 dc, ss into first sc
  4. 1 ch, 2 sc in same stitch as ss, 1 sc in next stitch, *2 sc in next stitch, 1 sc in next stitch*, repeat between * and * until end of row, ss in in first stitch
  5. 1 ch, 1 dc in same stitch as ss, 1 dc in next stitch, 2 dc in next stitch, *1 dc in next 2 stitches, 2 dc in next stitch*, repeat between * and * until end of row, ss in in first stitch
  6. 1 ch, 2 sc in same stitch as ss, 1 sc in next 3 stitches, *2 sc in next stitch, 1 sc in next 3 stitches*, repeat between * and * until end of row, ss in in first stitch
  7. 1 ch, 1 sc in same stitch as ss, 1 sc in all next stitches until end of row, ss in in first stitch
  8. 1 ch, 1 dc in same stitch as ss, 1 dc in next 3 stitches, 2 dc in next stitch, *1 dc in next 4 stitches, 2 dc in next stitch*, repeat between * and * until end of row, ss in in first stitch 
  9. 1 ch, 2 sc in same stitch as ss, 1 sc in next 5 stitches, *2 sc in next stitch, 1 sc in next 5 stitches*, repeat between * and * until end of row, ss in in first stitch
  10. 1 ch, 1 sc in same stitch as ss, 1 sc in all next stitches until end of row, ss in in first stitch
  11. 1 ch, 1 dc in same stitch as ss, 1 dc in next 5 stitches, 2 dc in next stitch, *1 dc in next 6 stitches, 2 dc in next stitch*, repeat between * and * until end of row, ss in in first stitch 
  12. 1 ch, 2 sc in same stitch as ss, 1 sc in next 7 stitches, *2 sc in next stitch, 1 sc in next 7 stitches*, repeat between * and * until end of row, ss in in first stitch
  13. 1 ch, 1 sc in same stitch as ss, 1 sc in all next stitches until end of row, ss in in first stitch
  14. 1 ch, 1 dc in same stitch as ss, 1 dc in next 7 stitches, 2 dc in next stitch, *1 dc in next 8 stitches, 2 dc in next stitch*, repeat between * and * until end of row, ss in in first stitch 
  15. 1 ch, 1 sc in same stitch as ss, 1 sc in all next stitches until end of row, ss in in first stitch
  16. 1 ch, 1 sc in same stitch as ss, 1 sc in all next stitches until end of row, ss in in first stitch
  17. 1 ch, 1 dc in same stitch as ss, 1 dc in all next stitches until end of row, ss in in first stitch
  18. 1 ch, 1 sc in same stitch as ss, 1 sc in all next stitches until end of row, ss in in first stitch
  19. 1 ch, 1 hdc in same stitch as ss, 1 hdc in all next stitches until end of row, ss in in first stitch

finish off, weave in ends and then you make the other half of the toy in the same way.


how to attach the parts together

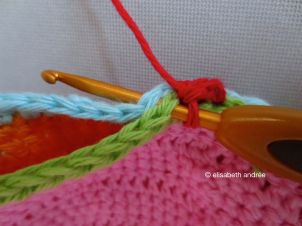
hold halves with right sides together and crochet them together with single crochets (see photo) but leave a part unworked large enough for turning and stuffing, cut yarn but leave the yarn end long enough to close the toy after stuffing.

turn the right sides out and start filling but it is better not to put to much into the toy, that way it remains soft and easy to hold by a dog without getting cramps in the jaws.

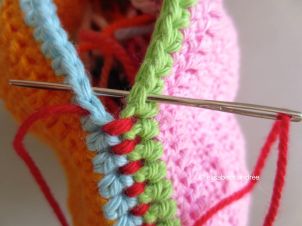
after filling, sew the last stitches by pulling needle and yarn under the same loops as you would with a crochet hook (see photo).

weave in yarn ends and your toy is ready to play with.

two doggie toys and a mouse


time to welcome the weekend, but first i will join: creative friday at natural suburbia

hope to see you soon!

.


11 Comments

lacy with dot square crochet pattern

below you will find the crochet pattern for the lacy with dot squares. they are easy to make, therefore the pattern is without further explanation.

i have used the american english crochet terms:

  • ch = chain 
  • ss = slip stitch
  • dc = double crochet
  • tr = treble 


lacy with dot square

(adjustable size)


UPDATE

while crocheting these lacy squares, i believe – on second thouthts – the first 1-space of each row does not look pretty. glad to say that it is easy to improve: from row 3 end each row with a slip stitch in the 2nd chain in stead of the 3rd of the beginning chains. sorry for any inconvenience, i already adjusted the pattern. 


version 27 feb 2014


start with a magic ring

row 1.
crochet 3 ch and 23 dc in ring (=24 dc), ss into the 3rd ch.

row 2.
4 ch, 1 tr, 1 ch, 1 dc all into the same stitch as where you made the ss (first corner made), 1 ch, [ *skip 1 stitch, 1 dc into next stitch, 1 ch* (twice), skip 1 stitch, 1 dc, 1 ch, 1 tr, 1 ch, 1 dc, 1 ch all into the next stitch (next corner made) ], repeat between [ and ] another 2 times, **skip 1 stitch, 1 dc into next stitch, 1 ch** (between ** and ** twice), ss into the third ch of the beginning chains.

row 3.
4 ch, skip 1 ch, 1 dc, 1 ch, 1 tr, 1 ch, 1 dc into tr, 1 ch, skip 1 ch, [ *1 dc into next dc, 1 ch, skip 1 ch*, repeat between * and * until  you reach the next tr, make into tr: 1 dc, 1 ch, 1 tr, 1 ch, 1 dc, 1 ch, skip 1 ch ], repeat between [ and ] until you have made the fourth corner, the last part after the fourth corner you repeat: *1 dc into next dc, 1 ch, skip 1 ch until end of row, end with ss into the second ch of the beginning chains.

row 4.
4 ch, skip 1 ch, [ *1 dc into next dc, 1 ch, skip 1 ch *, repeat between * and * until you reach the tr, make into tr: 1 dc, 1 ch, 1 tr, 1 ch, 1 dc, 1 ch], repeat between [ and ] until you have made the fourth corner, the last part after the fourth corner you crochet: **1 dc into next dc, 1 ch, skip 1 ch** , repeat between ** and ** until end of row, end with ss into the second ch of the beginning chains.

row 5 and further.
repeat row 4 until your square has the size you like and then you can weave in the yarn ends.


my black squares have 15 rows including the first row with the 24 double crochets.

black lacy with dot square

the squares of my green and dots blanket have 11 rows including the first row with the 24 double crochets.


for both i used acrylic yarns, the green one is saskia, more info about that yarn on ravelry via this link:
info about saskia yarn

the black yarn is stylecraft special dk, more info about that yarn on ravelry too via this link:
info about stylecraft special dk 

for the black squares i use crochet hook size 4.5 mm. 

to illustrate: each color gives a square a different look. these examples i have made of leftovers ​​acrylic yarn, the light green and the small white squares of cotton yarn.


that is it, enjoy!

lacy with dot squares

.


10 Comments

storage bag with fishes tutorial

finally here is the tutorial for the storage bag

used stitches (american english terms)
ch = chain
ss = slip stitch
sc = single crochet
h dc = half double crochet 
dc = double crochets
2dctog = 2 double crochets together
used materials  
for this project you can use the type of yarn with matching crochet hook you like to use. i used yarn that is no longer available because it has been removed from the collection,  it is of scheepjes (a dutch label) from their collection of a few years ago with crochet hook size 4.0 mm.


before you start, please read these notes:
to create the bottom of the bag you can use the tutorial for crocheting in the round, here is the link to it
unless described otherwise, throughout making the bag you end and start a row as described in that tutorial, even after you have stopped increasing, and it applies to all types of stitches you use. 
 
it goes like this:
  • end each row with a slip stitch into the first stitch
  • make a chain
  • start the next row by crocheting the first stitch into the same stitch you have made the slip stitch in
  • forget the chain
  • continue
 
the bottom of my bag has a diameter of 34 cm, from that point i stopped increasing the number of stitches. 
after you have made the bottom you can continue with crocheting the body of the bag.

bottom storage bag


body

 
row 1. single crochets
 
rows 2-5. single crochets into the back loops only
 
a.
row 6. double crochets into both loops
row 7. single crochets into the back loops only
row 8. repeat row 6
row 9. repeat row 7
row 10. repeat row 6
row 11. repeat row 7
row 12. repeat row 6
row 13.  repeat row 7
row 14. repeat row 6
row 15. repeat row 7
storage bag stitch pattern 
b.
rows 16-19. repeat rows rows 2-5.
 
c.
repeat a. and b. until you think you bag has the height you like it to have, my bag is about 35 cm high.
end with b.
 
rows 20-21. singles crochets into both loops.
 
finish off.
 

top of the bag and handles

storage bag by elisabeth andrée

 
lay down your bag flat and measure at both sides the starting and ending points of the handles, mark the points for example with contrasting colored yarn or paper clips. 
  1. attach the yarn onto the starting point of the first handle, make 1 sc into the same stitch and crochet chains until you have the desired length for the handle, remember the number of chains. the handles of my bag measure approximately 39 cm. make 1 sc into the ending point (that you have measured). crochet sc until the beginning point of the second handle and repeat what you did for making the first handle. end with a slip stitch into the first sc.
  2. 1 ch, make around the chains of the first handle – not into the chains – 2dctog as many you need to create a usable handle and 1 sc at the end of the handle, make slip stitches until you reach the second handle, repeat making 2dctog as you did for the first handle, make slip stitches and end with a ss into the first stitch, don’t fasten off.
    handles of storage bag
  3. lay down flat your bag with the handles together and measure at both sides of the bag the points where you like to have the ties to close the bag.
  4. crochet slip stitches all around the top of the bag including the handles, but at the points for the ties you crochet chains until you have about 16 cm then crochet slip stitches into the chains back to the top of the bag, continue with slip stitches around the top, end with a ss into the first stitch, fasten off and weave in yarn ends. 
  5. between the handles you crochet 1 row of ss, for the ties you do the same as described at 4, fasten off and weave in yarn ends. 

storage bag detail: ties

decorations

water plant with leaves
 
this is an example of how to make a ‘water plant’ if you like to see more options, please check here.
 
  • crochet chains and make leaves where ever you like.
  • to make a leaf you need 6 chains and you work under two loops: 1ss into the 2nd ch from hook, 1 h dc, 1 dc, 1 h dc, 1 ss.  
  • if the branch is long enough you work all the way back to the first ch making slip stitches into all the stitches working under 1 loop.
  • sew the branch onto your bag, i have my plant sewn over the ‘scar’ of the bag and partly onto one handle.
 
fishes, eyes and bubbles

bubbles on storage bag

for the fishes i used these patterns:
 
for the eyes i made french knots, this is a tutorial if you like to make eyes like these too.
 
for the bubbles you make 2 ch, 6 sc into the 2nd chain from hook, finish off.
 
sew fishes and bubbles onto your bag.
 
if desired, you can provide your bag with a liner and your bag is done.

enjoy!