on request i made a tutorial for a project that is not very complicated, so it is suitable for beginning crocheters and anyone who likes to join. i assume that you can make all the basic crochet stitches and the magic loop, but practice makes perfect, right 🙂 this tutorial is intended to practice and based on that to make cute little things.
during this project, you practice the following:
- the magic loop
- threads neatly weaving in
-
stitches (terms in american english):
- chain = ch
- slip stitch = ss
- single crochet = sc
- half double crochet = h dc
- double crochet = dc
- treble = tr
-
you will make:
- triangles
- squares
- heart-shaped motifs
- an edge

used materials:
for crocheting these motifs, i used an average cotton yarn and a crochet hook size 3 mm, but you can use another type of yarn.
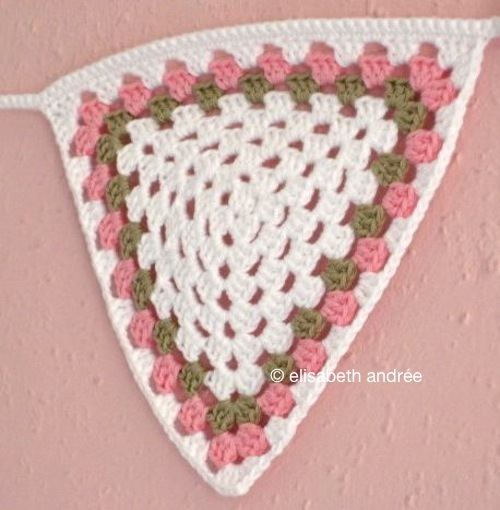
let’s start with the first triangle
see for a great tutorial how to finish your crochet work neatly: seamless + symmetrical
make as many triangles as you want, i have made a total of 24
the making of the garland
for the garland you just have to crochet a lot of chains. i counted all the chains at the beginning and end of the garland and between the triangles. if you do not like to count, just use a measuring tape.
in this tutorial there are two ways to attach the triangles.
method 1.
you make slip stitches or single crochets along one side of the triangles, in the back loops only. see photo.
method 2.
i find it more fun when the motifs dangle. for this i made a single crochet in the middle dc of a corner. see photo.
and in this way you can turn your little triangles with many chains into a nice garland.
_
small variations
1. sharper corners
if you want to have your triangles sharper corners, you can replace the middle of the five dcs by a treble. how to make the edge, i’ll tell you later in this tutorial.

2. heart-shaped motif
of these triangles you can quite easily make a heart-shaped motif.

see note ***
triangle to square
this triangle you change in an instant to a square.


see note ***
making the edge

see note ***
note ***
you can make a ss but it is better to cut the yarn and weave in the ends the same as explained in the making of the first triangle. see the tutorial of sarah london: seamless + symmetrical
larger motifs
both triangles and squares you can make larger by repeating row two. you start row 3 and all subsequent rows the same as row two, you just make – the bigger your motif gets – each time more stitches between the corners. you make a corner by crocheting 5 dc into the middle of the 5 dc of a corner of the previous row.
blocking
if you crochet larger squares and triangles, they can be a bit bumpy. how to bring them beautiful into shape, you’ll read in this spray-blocking tutorial.
this is the end of the tutorial. hope you like it! see you next time! keep crocheting!


You must be logged in to post a comment.